
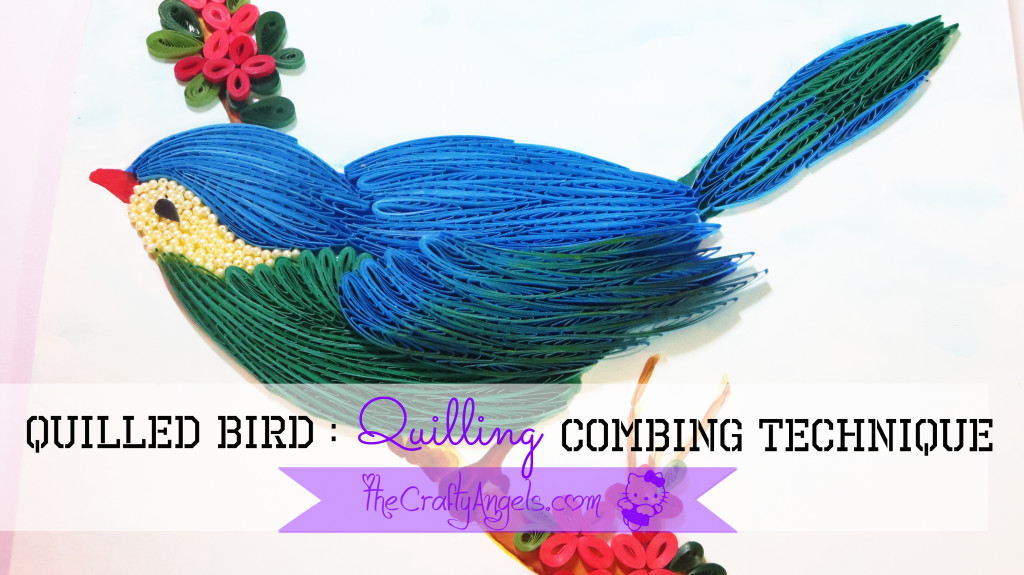
Quilling Combing technique : Quilled bird
Quilling combing technique tutorial : Read on to know how to make this beautiful quilled bird using quilling combing technique with step by step photograph.
This is a project I started working on along with quilled flower I made with double sided quilling comb (HERE). But somehow as I had very rightly anticipated, bigger projects are totally not my cup of tea and I have been dragging this so much that right now I have stopped everything else to just get done with this! I need to find a perfect frame for this quilled bird made using quilling combing technique but yeah well..maybe after a while :P! Thankyou Priya for giving me the push to create something different 🙂 Yeah so for anyone who want to buy this double sided quilling comb that I have used for this quilled bird, HERE is the link to product.
Be sure to also check out all the quilling tutorials covered :
- Basic Quilling tutorial : Making Flat Tight Quilled Coils
- Basic Quilling instructions : Quilled Teardrop Shape
- How to make Quilled Flower Petals without tools
- How to make Quilling Leaves without tools
- Quilling Butterfly Tutorial
- Tight Quilled Flower Tutorial
- Beehive technique Quilled flower tutorial
- Quilled Wall Hanging Tutorial
- Quilled Hearts Card Tutorial
- Quilled Malaysian flowers Tutorial
- Quilling Comb Flower Tutorial with Video
- Double Sided Quilling Comb review & Tutorial
- Quilling Combing technique : Quilled bird
Materials required to make Quilled bird using Quilling Combing Technique :
- Quilling strips of desired shades
- Cardboard piece preferebly corrugated ones ( jjust grab one from any packaging boxes)
- Outline of a bird
- Glue, Paper pins, watercolors etc
Step by step procedure to make Quilled bird using Quilling Combing Technique :
There is no hard and fast rule as such for this technique and it basically involves fitting in a coils in a specific flow. So lets first see how to go about it.
First thing you need is the outline of the figure you are going to fill – a bird in my case. I printed out a bird outline from the internet and decided the colors I was going to use for each part. My advice would be to have a bigger canvas because my attempt on a smaller one did not give the desired look. The bigger the better! The present bird outline was made to match a 12’x12′ background.
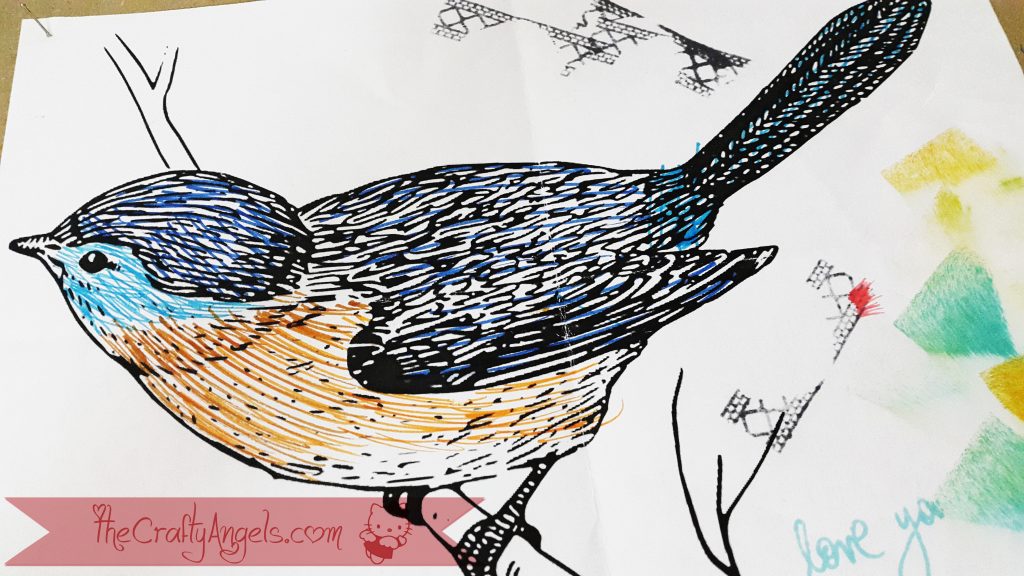
(I had printed out the bird long time back and not started work yet so kinda used it as a rough paper for stamping 😛 Ignore the mess!)
Next thing you need is your quilling comb to make the building blocks. I have used a double sided quilling comb reviewed and used HERE before, for this project as well. You need to make the basic shape of flat coils by looping your quilling strip between the teeth of the comb from inside to outside.
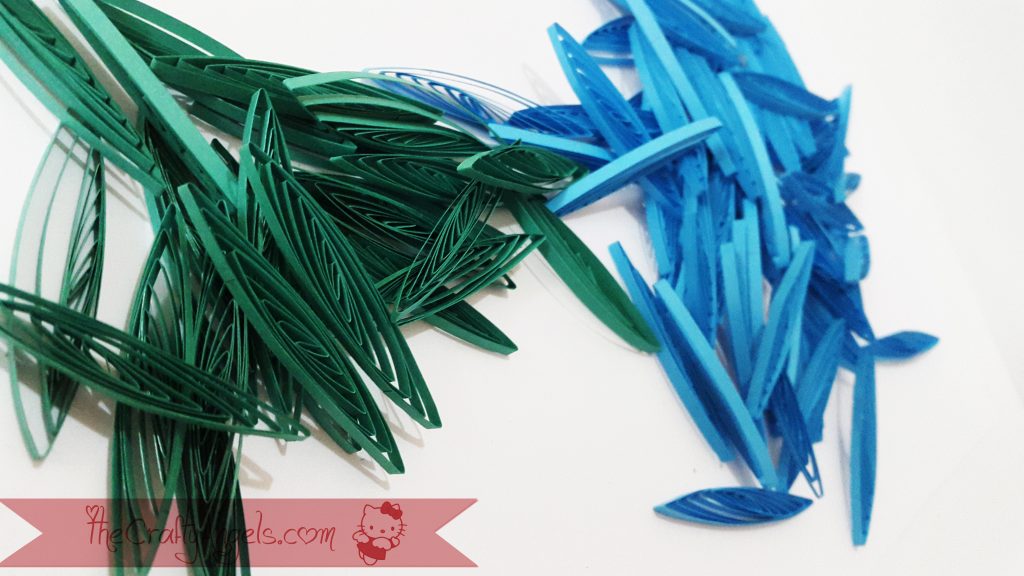
- Make as many as you think might be required in shades as per your selection.
- Next you need to adhere your outline to your corrugated cardboard and cover it with a transparent sheet of OHP sheet or anything just to make sure your quilled stuff doesnt stick on to your background.
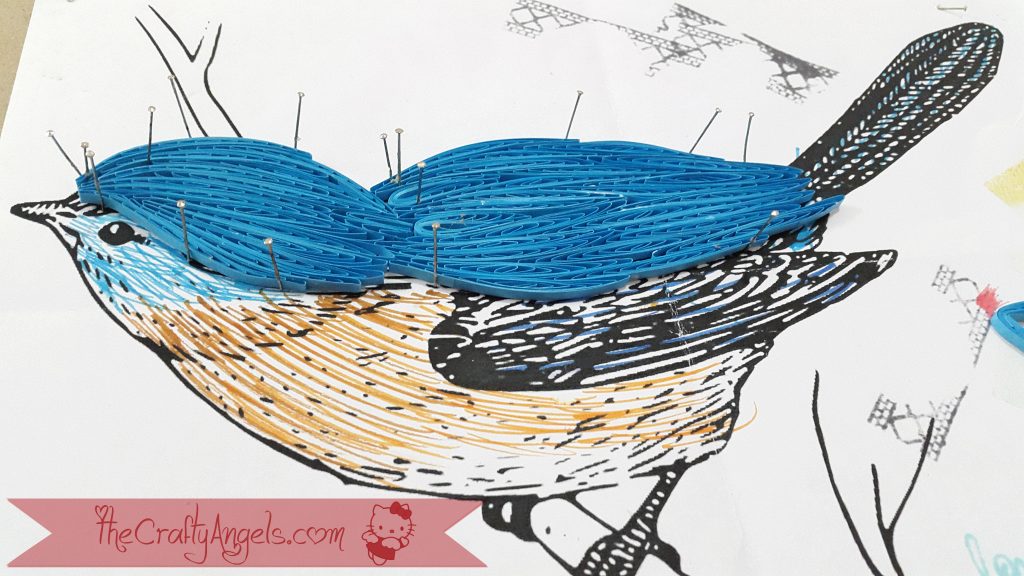
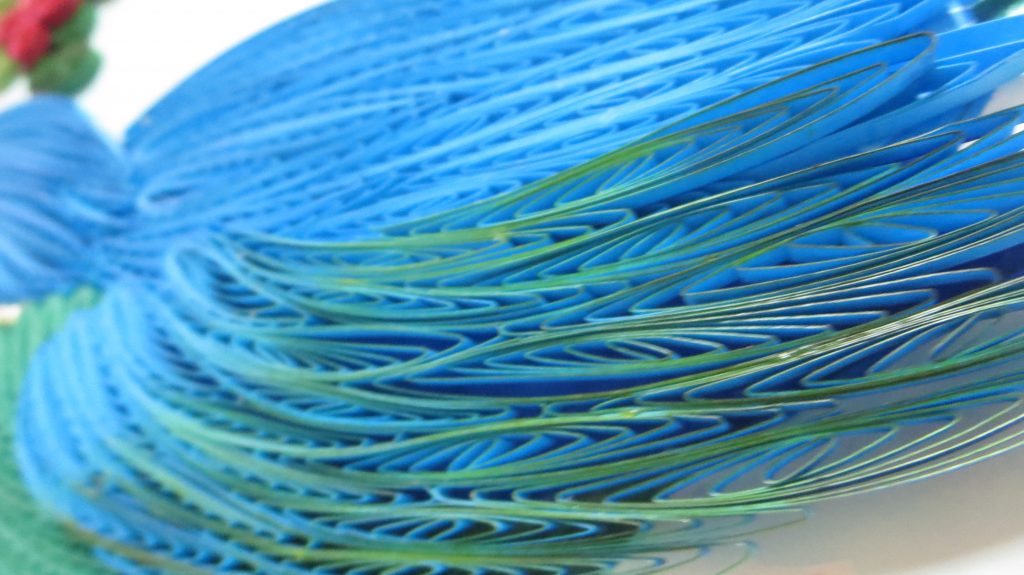
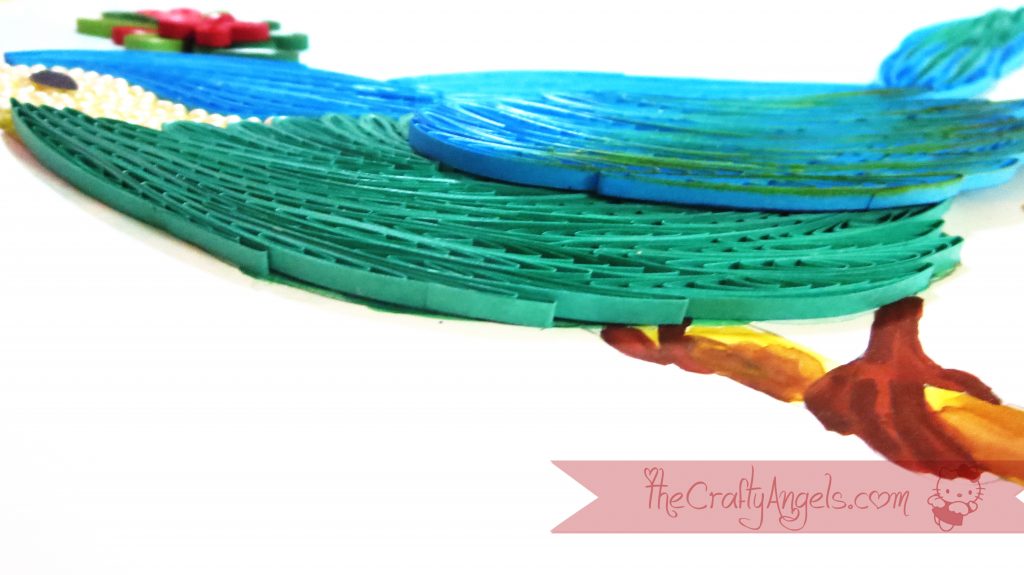
- The bad thing about this techniques is that you need to have some sort of imagination and memory recollection talents 😛 Imagine how the feathers on a bird stay I mean realize the curves and stick your flat coils in the direction of the curves.
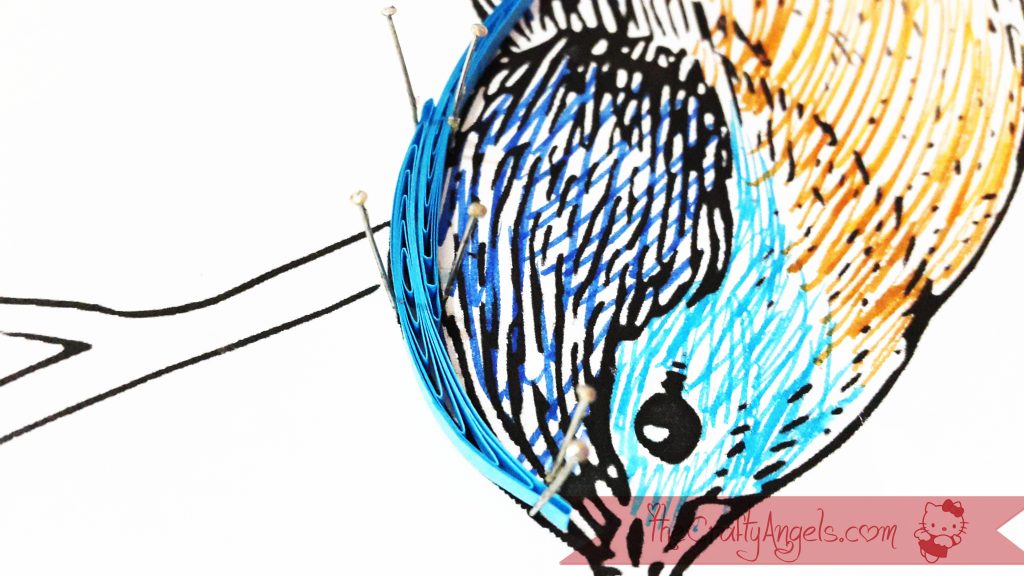
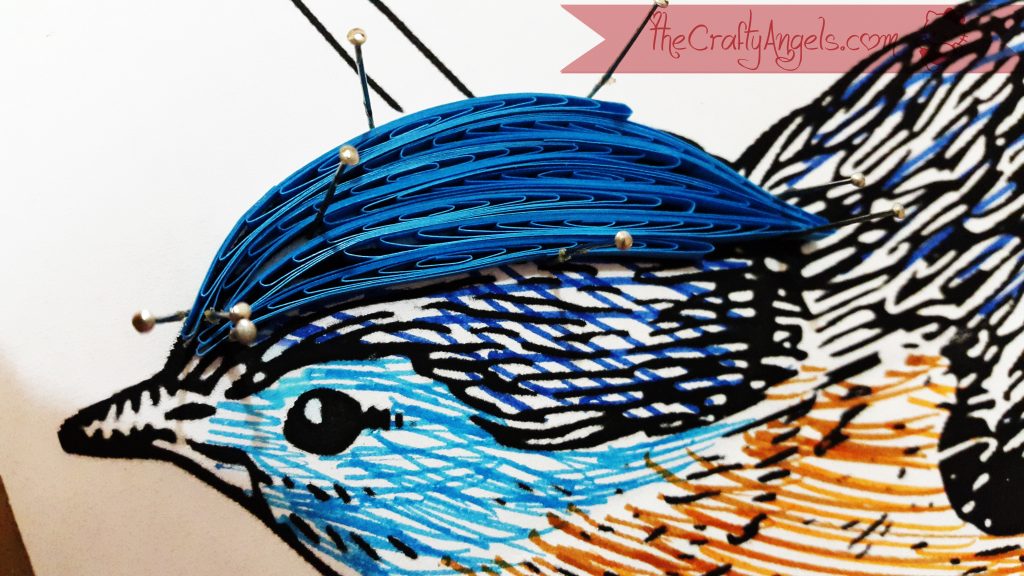
I am sharing a few pics that shows you how I made the head part of the bird. If you simply keep sticking them side by side, eventually when you reach the bottom side, you till end up with a huge semicircle shape that you are unable to cover up! So think flow, work flow, quill flow!
Start with making a border from one end and cover about 3/4th of the area in the direction of flow. You can twist and turn your basic shape to curve it as much as you require and secure it with paper pins like in the photograph.
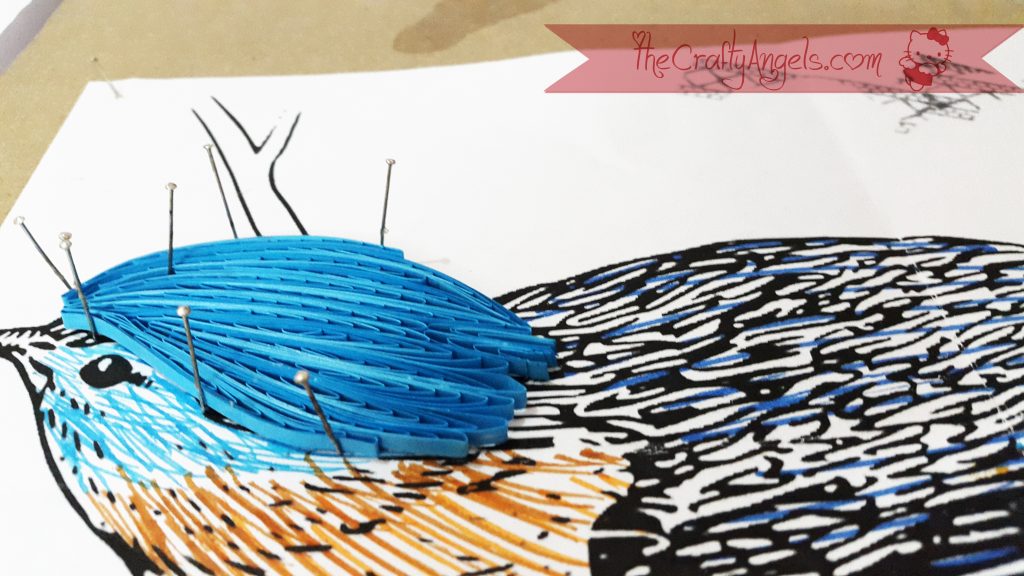
Keep adding your shapes side by side by using glue only at the sides. Now the trick is to understand your basic shape : tapering at the ends and thicker at the center which means if you are to get an even layout you should be placing the eye of the shape side to tapered end of adjacent shape just like how you see in the photographs.
Once you start feeling that the flow is being disturbed, one trick is to start inserting the shapes in V shape instead of sticking side by side like this “<<<<<<<<“. It will help fill up some space without changing the flow.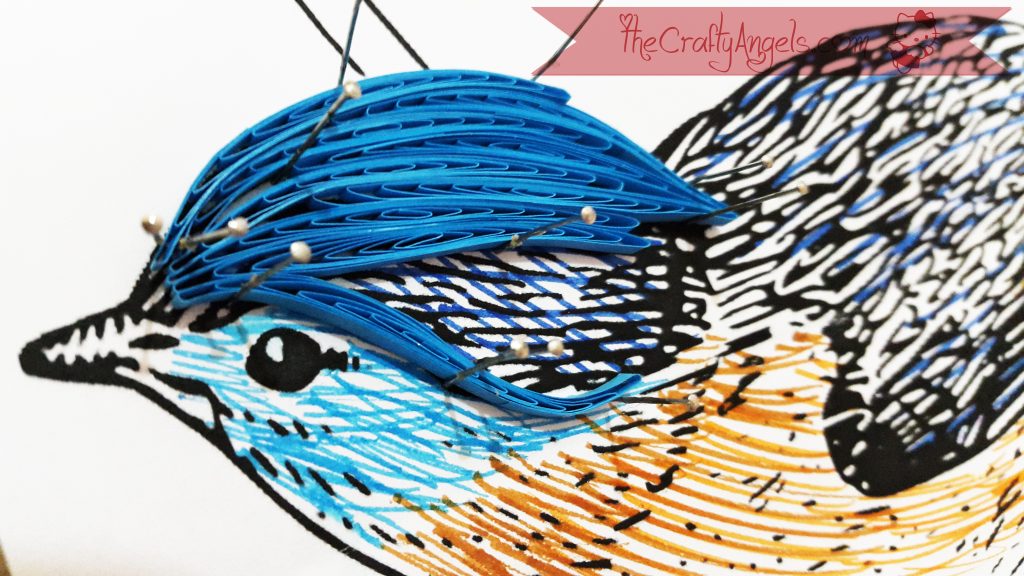
So thats how you keep filling in spaces. Also another trick is to fold the basic shape half way just like how did for filling in some space at the wings and body area. See what I mean?
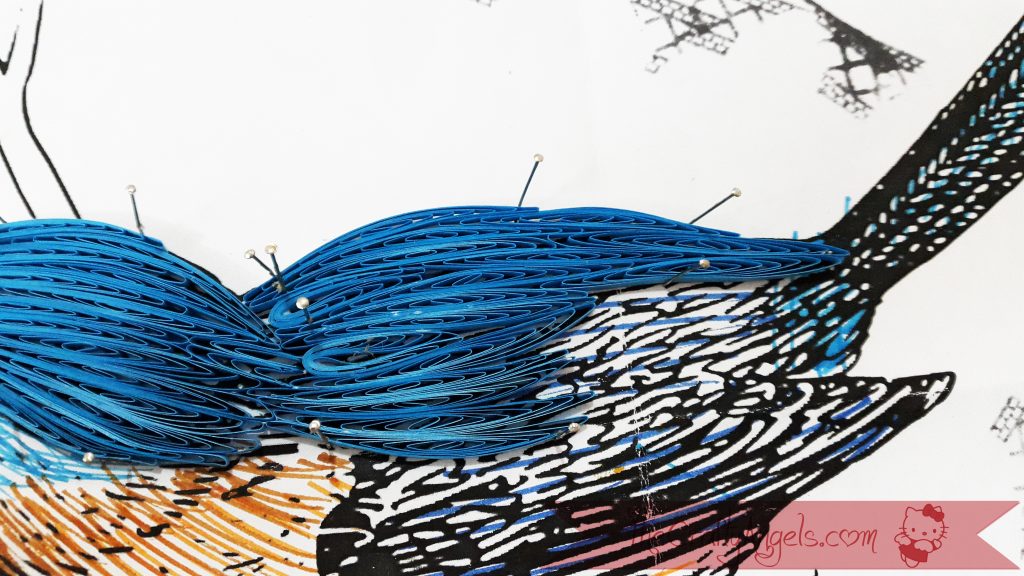

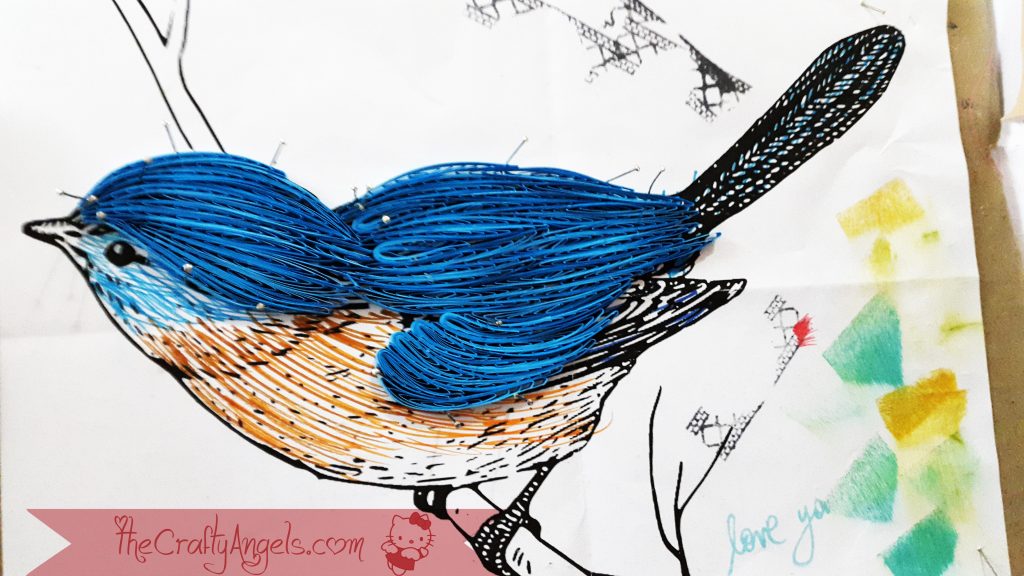
The only thing to take care is to 1)Do not stick to the base but stick side to side and 2) try not to break the flow!
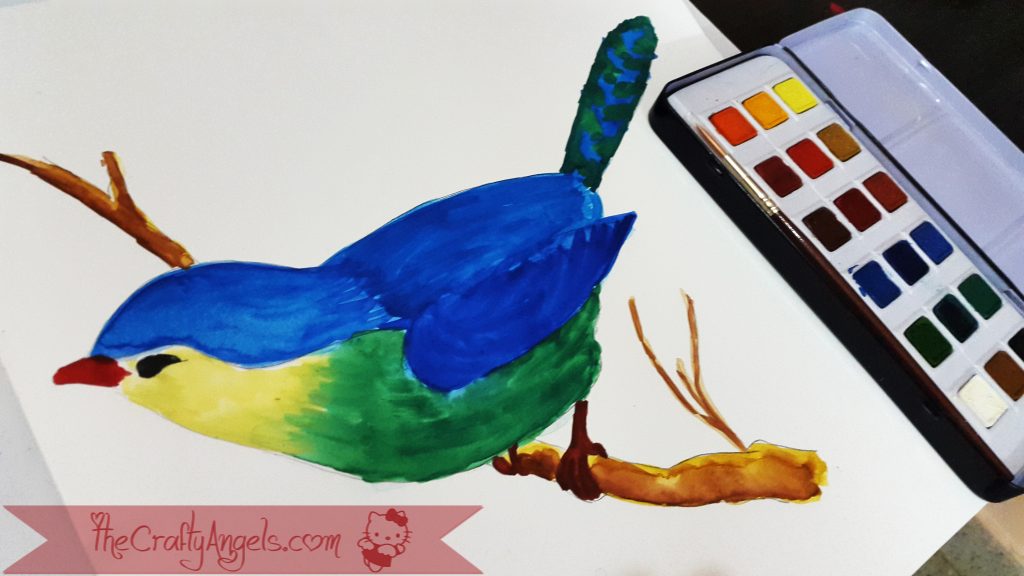
I made sectionwise like the head was a piece, wing, tail and rest body another piece and likewise. I make traced a copy of the bird on my actual base and painted it with watercolors close to the color of my quilled bird.
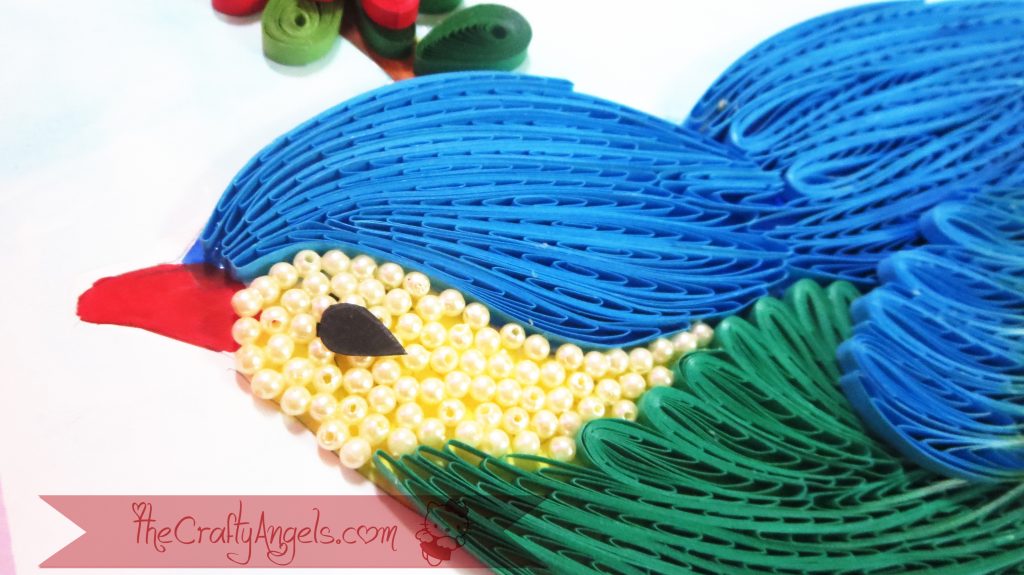
I filled up the neck area with small white beads because I somehow couldnt think of filling it up plus I was tired of quilling and dragging this project literally 😛 ! So one by one I assembled the rest of the quilled parts that were removed carefully from my OHP sheets after they were completely dry and assembled them on my painted base.
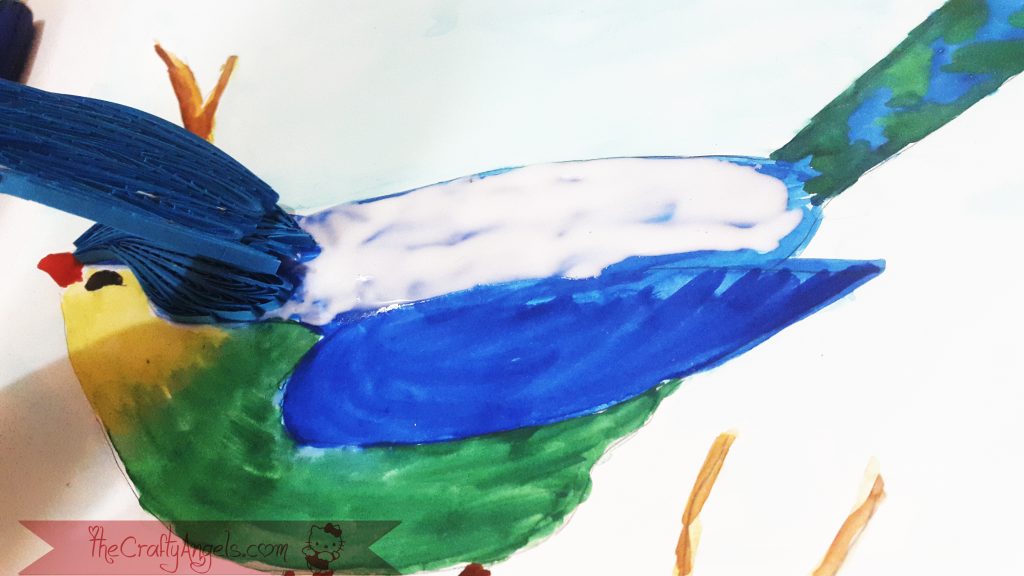
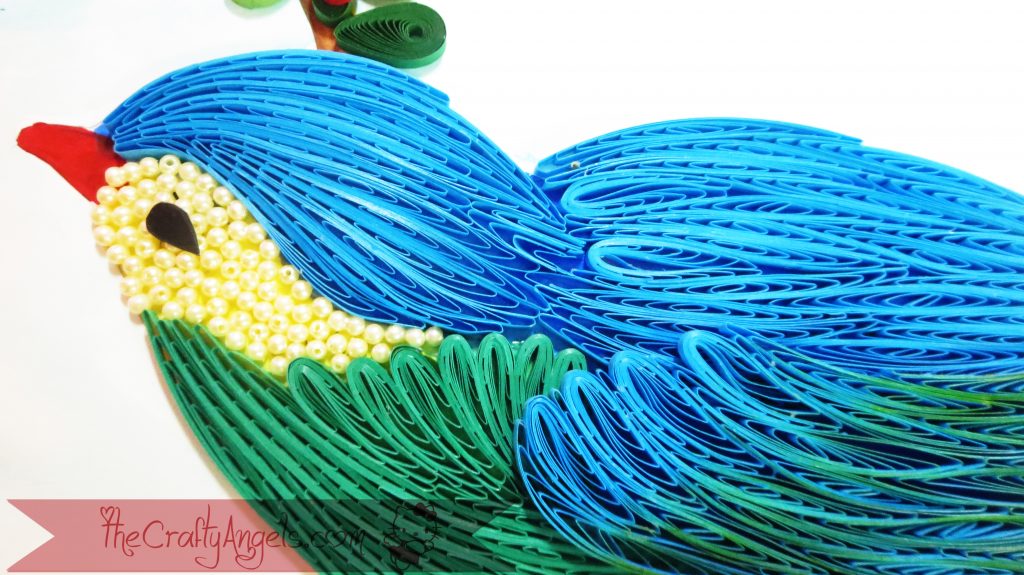
I smudged some green distress inks on the wings to make a shade difference as I thought it looked very plain and undifferenciable.
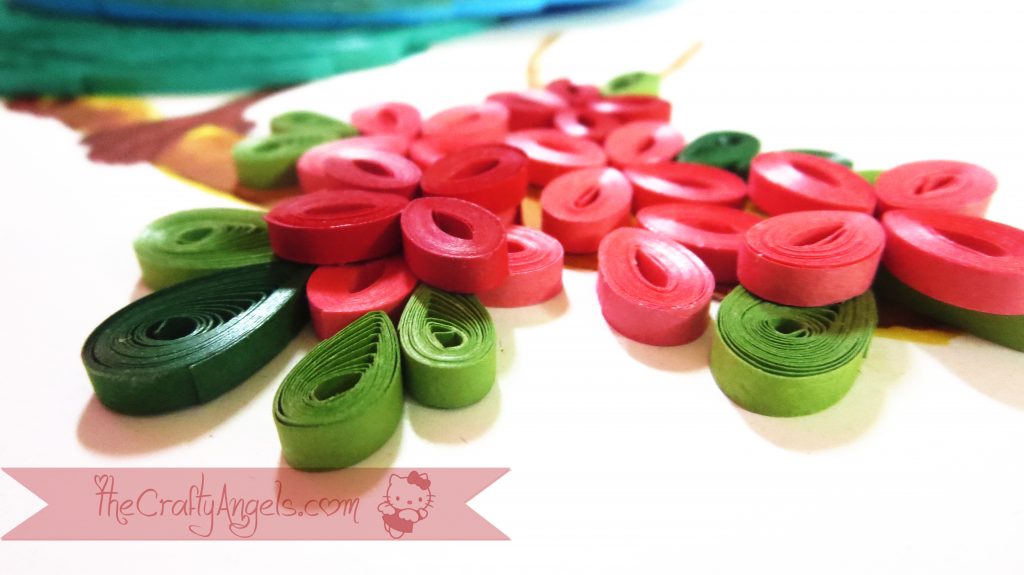
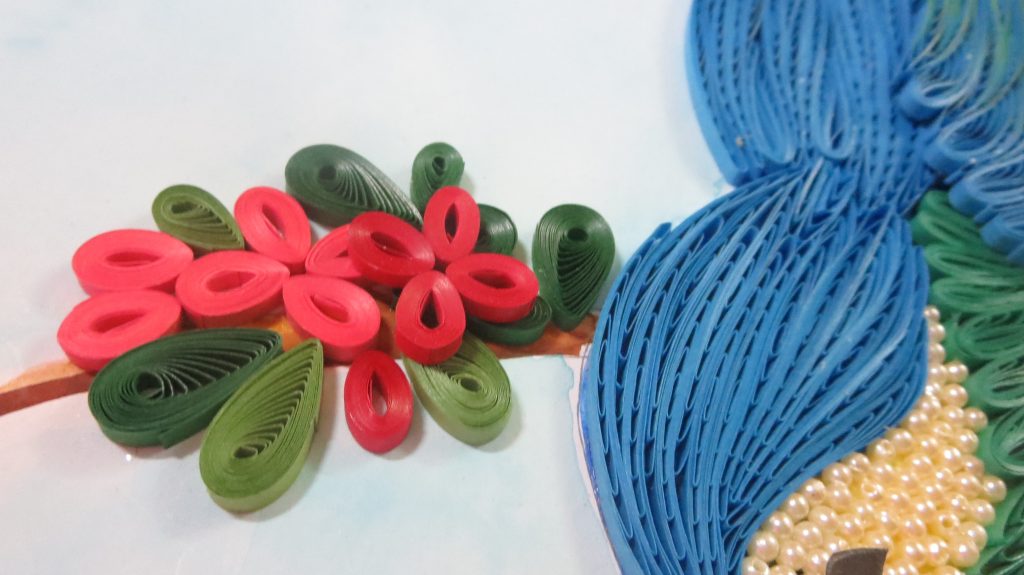
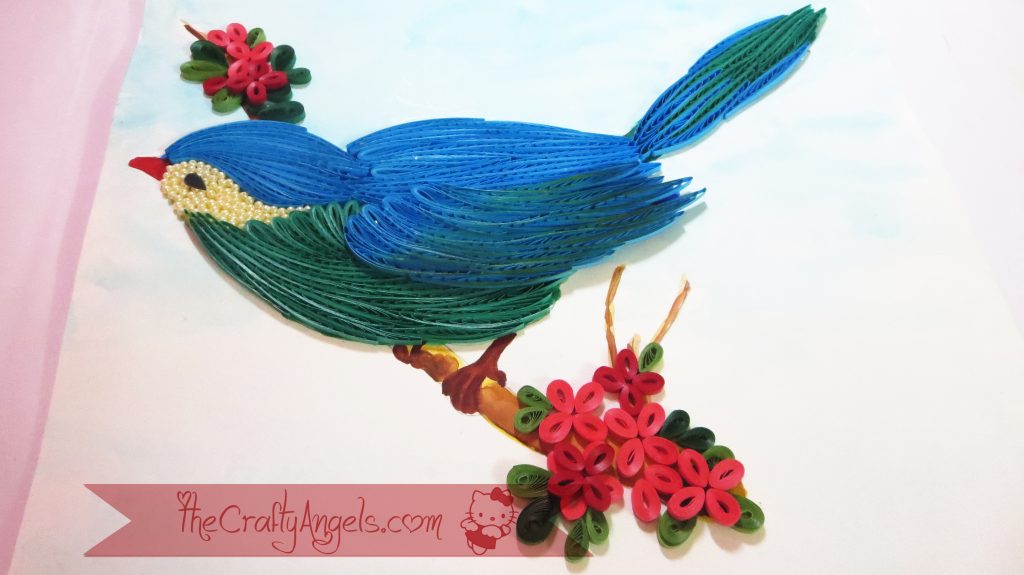
A few simple flowers on the branches to complete the look and here are the final pics.
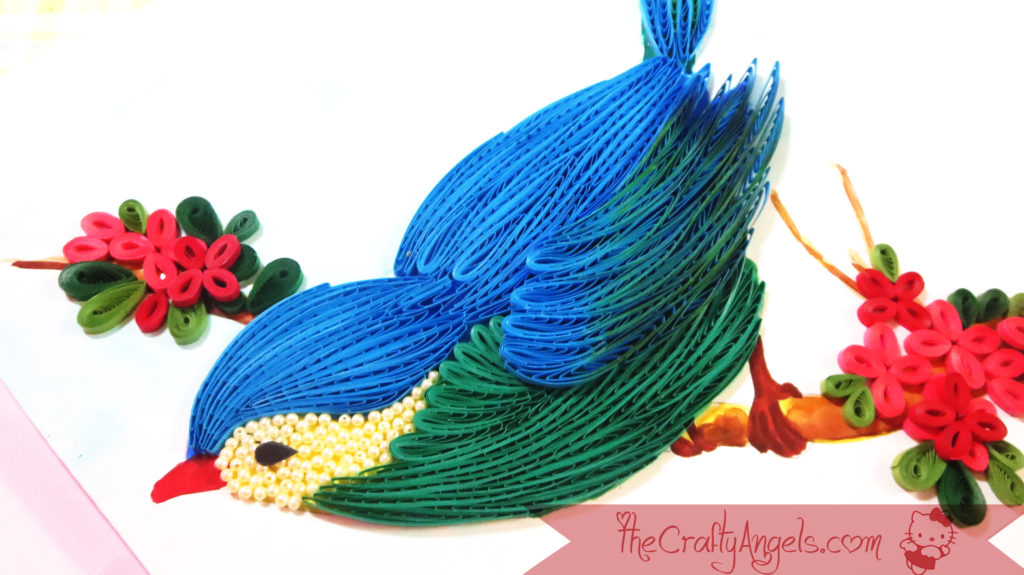
Since I made each part sectionwise, I made the wings as a second layer so that it kinda looked real and 3D.
Tips for making Quilled bird using Quilling Combing Technique
- Think of making a big when you want to try quilling comb technique
- Try to fill in the spaces in the actual flow of the object being made.
- Decide sections and create your works part by part by using an OHP sheet over your outline as the base. You can later use a fair background with neat coloring over which you can org anise your quilled parts.
- Glue the base modules side to side and not to the base so that you can remove them easily.
So did you guys get bored with this really long tutorial ?? Well I clearly did not enjoy working on this long project but Im more than happy seeing the end result hee hee !!All I need to do now is to frame it up and proudly display in my living room 🙂
If you guys have tried anything like this before, please do remember to send me an email at thcraftyangels@gmail.com. I would really really really love if you would give me a thumbs up for all the effort and do one small sharing on social media for me 🙂
xoxo Angela

Wowww fabulous neatly done and well explained.am definitely going to try it.kuddos for ur excellent work.
Thankyou so much akshma 🙂 Im glad my tutorial is of some help to you 🙂
molto carino, brava ciao.
Grazie mille Giovanna! 🙂
This is amazing and you have explained it so beautifully . I can well imagine you wanted to finish it off..I too stopped quilling because beautiful projects demanded more time!!
Hello Sonia! Im so glad to see you visit my blog and you being the queen of tutorials, I’m more than happy to receive compliments on the tutorial 😛 Quilling I sweat demands more time and patience but the end result is so beautiful 🙂 But I could just not finish it howmuchever I was working and I hated seeing it on my table crying for help everyday! Glad im just done with it finally 😛
It is so beautiful!! Thank-you for showing how you did this. I haven’t quilled in a while. You make me want to get back into quilling on the cards I make. I love the colors of the !!
Thank you Carol for your kind words 🙂 Quilling is addictive although everytime I quill it makes me go mad 😛 but every break I take makes me want to go back again! Do let me know if you have a blog or page where you showcase your works..I would love to come by and see 🙂
Wow that is brilliant. Thank you for the tutorial. I mainly quill flowers but you have made me want to try something more ambitious. The tutorial seems very easy to follow.
Hello Alison! Thankyou for the encouraging words. They really do push me into sharing more and more tutorials 🙂 And yes even for me quilling meant flowers until this project which was to be quite frank exhaustive but worth every effort! Please do share a link to your blog or page so that we could stay in touch 🙂
my self chinnu suraj from Nagpur. am a big fan of your blog… the crafty angels… after my marriage i moved to Nagpur from Kerala,needless to say i had a lot of free time as am not working and get so bored at home..the only thing i had to do was preparing for competitive exams.i really loved to do something creative..and a few days back i came to see your blog…yes that was an inspiring moment. and you are a true inspiration to me…each and every craft is so neatly done and fabulous. i am trying to make some… and once done with it will send you the photographs. 🙂 🙂
Aw Chinnu you really made my day!!! Im so happy to hear i could bring some cheer to your day 🙂 I know how hard it could be to move to a new place plus all the boredom at home! Do concentrate on your studies and take some time off in crafting or any DIY as a break 🙂 I wish you all the very best dear and do stay in touch. I would love to see your creations 🙂
What an awesome quilling project….the quilled bird looks fabulous…
Thanks a lot for the tutorial!!!
Thankyou Purvi 🙂 Do try this or maybe any other protrait paintings and let me know if my tutorial helped 🙂
Where did u get the bird outline.the link pls ??
Hey Akshma, I actually got it through google image search but right now im not able to find it 😛 please try “bird outline” “bird on branch outline” search terms and there are many similar ones that can be used 🙂
Wow. You’re so inspiring. <3 Truly appreciate your constant effort that has turned out so fruitful as well. 🙂
Thankyou Priya 🙂
This is so flippin animazg. DYING over the Hermes quilling. So beautiful!!!!! I can barely cut a straight line with an Xacto knife so I’ll just sit back and admire.
wow, gorgeous bird! I love the look of the feathers – so realistic!
Hey thanks honey. It did dry out my patience and this bird came out right on my second attempt 😀 Lessons learnt – “slow and steady wins the race” & ” success comes with consistent effort” . Quilling is really an inspiring craft!
Angela, I loved this piece so much! It is inspiring! Thank you for sharing such a great tutorial. I hope that we will see more?
Thankyou so much Karen for dropping by 🙂 Im glad that my tutorial is an inspiration to you. Do leave a link where I can find your work..would love to drop by 🙂
wow, thank you for the tuto of the bird, you are really generous
thank you and thank you again
Thankyou Jacynthe for leaving a thankyou note 🙂 Always my pleasure making tutorials 😀
Love the shading with the ink. Nice idea.
Thankyou so much Anjana. Glad you liked this quilled bird 🙂
Hey Angela,stumbled across your blog and loved this comb quilled bird. Thank your for sharing the tutorial,would really love to try it. I have been wanting to do a skilled portrait pic but just didn’t know how to make those comb skilled coils.
I tried your link of using the double comb, but it doesn’t work, would you please share or guide how you made the flat coils…
“You need to make the basic shape of flat coils by looping your quilling strip between the teeth of the comb from inside to outside”.
Regards
Arlen